 Since the main focus of the “Off-Camera Flash: Beyond the Basics” class is to get one’s flash off the camera and since we have reviewed some of the basics of shooting with a flash, I now begin to have students work with one flash off their cameras. (See this post: http://www.infotor.com/blog/getting-your-flash-off-the-camera/) I have light stands to hold the lights, but we also discuss alternatives, such as the little, plastic stand that comes with all brand name flashes and most third-party flashes. The flash unit fits into the shoe on these stands and, usually, the stand has a 1/4-20 screw mount on the bottom that will allow you to mount the stand to a standard tripod if you don’t have a light stand. We also discuss the possibility of simply placing the stand on a tall stool, stack of books, or anything else that elevates it some.
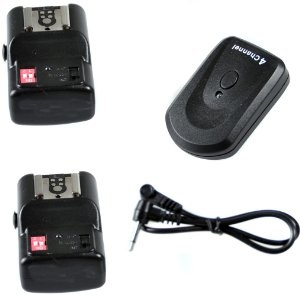
Once we take the flash off the camera we then need to address how we are going to fire them. As noted in the above referenced post, we have three options: a long wire, wireless control from built-in, pop-up flash if your camera and flash support this method, or wireless, radio triggers. (see this post: http://www.infotor.com/blog/flash-on-wednesday-controlling-your-flashes-wirelessly/; and this one: http://www.infotor.com/blog/flash-friday-using-my-new-pixel-king-radio-triggers-for-the-first-time/). I recommend the radio trigger route, as it can be done fairly inexpensively and gives you a lot more freedom of movement and light placement. If, however, you do go the bargain-basement, inexpensive route, you must work in manual flash, no E-TTL or i-TTL. This is not a bad option, though, as working in Manual flash mode is really the best way to go anyway when you have control over light-to-subject distance, i.e., a modeling or setup shot. And if you are kind of on the fence about committing to using flash in the first place, it is nice to know that you can set yourself up with one inexpensive flash (Neewer TT560 Flash Speedlite: link) and an inexpensive set of radio triggers (CowboyStudio NPT-04 4 Channel Wireless Trigger: link) for less than $75! If you then decide you want to delve into flash more you can buy additional inexpensive flash units (the above referenced trigger pack actually comes with two receivers!) or you can spring for a brand name unit or high end third-party unit that will work together with your camera in the automatic modes (E-TTL or I-TTL) and use the Neewer unit as a slave. Win-win!
 OK, so you now have a flash unit you can set up on a tripod or tall stool (or light stand and flash bracket if you have decided to spend another $20!) to get it off your camera. But what do you do with it now? To start, you'll need to attach the radio trigger transmitter to your camera's hot shoe and your flash to one of the radio trigger receivers. Then you connect the receiver/flash combo to your stand and position it to the right of where you intend to stand with your camera as you face your subject (person or object/still life). You need to experiment with positions until you get the results YOU want, but try starting at about 45° camera right (think of yourself as being at 6 o'clock as you face your subject so 45° would be somewhere between 4 and 5 o'clock). If you can raise the flash up, that would be good. This is, of course, very easy with a light stand but even with a makeshift stand you can probably get it up above your subject some.
In class, then, we go over different flash power settings and balancing that light output with our selected aperture to get the exposure we like. The primary advantage, though, to shooting with your flash off-camera is how you can now create shadows on your subject and create more dramatic images. That, together with controlling the existing, ambient light with your shutter speed (remember, shutter speed does NOT affect your flash exposure!) is what makes working with off-camera flash so much fun and gets your creative juices flowing.
My "Mobile Flash: Using the Flash Stick" class starts in late July. Check out the description and plan to register online at http://www.infotor.com/photoclasses/plannedclasses.php. I am also available to do one-on-one tutoring or small group lessons designed to meet YOUR needs and what you want to learn in the area of photography, using flashes, or the use of Apple products and software. Give yourself the gift of learning: http://www.infotor.com/photoclasses! Check out my special tutoring bundle: http://www.infotor.com/photoclasses/tutoringbundle.php!